Copyright 2012 - Sefendi Blog. Powered by Blogger.
Showing posts with label Tips And Tricks. Show all posts

Epson Stylus L200 Adjustment Program

Written By Sefendi on Thursday, November 22, 2012 | 10:32 PM


You can get software resetter for Epson L200, you can download at this link : Download Epson L200 resetter.

Instruction to use Epson L200 Resetter Software :
  1. Double click Adjprog.exe.
  2. The following screen appears. Press the "Accept".
  3. Press the "Particular Adjustment mode".
  4. On the next screen select Model Name "L200" as the following screen and then the OK button.
  5. Select the "Waste ink pad counter" and then click "OK".
  6. Select the "Check" to retrieve the current value. Then Pressing the button "Initialization" to reset the counter to zero.
  7. Press the "OK" and the counter will be reset.
  8. Turn off the printer as a program instructed then turn on again.
  9. Press "Finish" to close the screen.
  10. Close the software. Pressing the "Previous".
  11. In the next screen, click "Quit".
10:32 PM | 0 comments | Read More

How To Disable The Autorun Functionality In Windows

Written By Sefendi on Tuesday, March 27, 2012 | 9:25 PM

The spread of viruses, spyware or malware through a lot of USB flash disk. Virus-infected flash disk when connected to a Computer or Laptop is set to autoplay  /   autorun is enable (default), then the Computer or Laptop will be contracting the virus, unless the computer already has the latest anti-virus updates are identified virus.

To further maintain the security of our PC or laptop from malware attacks that caused flash disk / external HDD infected with the virus, we better turn off auto run in windows. 

Disable The Autorun In Windows XP Methods :
  1. Click Start, click Run, type Gpedit.msc in the Open  box, and then click OK.
  2. Under Computer Configuration, expand Administrative Templates, and then click System.
  3. In the Settings pane, right-click Turn off Autoplay, and then click Properties.
  4. Click Enabled, and then select All drives in the Turn off Autoplay box to disable Autorun on all drives.
  5. Click OK to close the Turn off Autoplay Properties dialog box.
  6. Restart the computer.
 Disable The Autorun In Windows 7 Methods :
  1. Click Start, click Run, type regedit  in the Open box, and then click OK.
  2. Locate and then click the following entry in the registry : HKEY_CURRENT_USER\SOFTWARE\Microsoft\Windows\CurrentVersion\policies\Explorer\NoDriveTypeAutorun
  3. Right-click NoDriveTypeAutoRun, and then click Modify.
  4. In the Value data box, type 0xFF to disable all types of drives. Or, to selectively disable specific drives, use a different value as described in the "How to selectively disable specific Autorun features" section.
  5. Click OK, and then exit Registry Editor.
  6. Restart the computer.
9:25 PM | 0 comments | Read More

How To Reset Waste Ink Pad Counter Epson Stylus T13 Printer

Written By Sefendi on Tuesday, November 15, 2011 | 8:23 PM


The first step Epson Stylus T13 Printer driver must be installed. You can download the following link : Download Driver Epson Stylus T13.
You can get software resetter for Epson Stylus T13, you can download at this link : Download Epson Stylus T13 Resetter.

Instruction to use Epson Stylus T13 Resetter Software :
  1. Double click Adjprog.exe.
  2. The following screen appears. Press the "Accept".
  3. Press the "Particular Adjustment mode".
  4. On the next screen select Model Name "Epson Stylus T13" as the following screen and then the OK button.
  5. Select the "Waste ink pad counter" and then click "OK".
  6. Select the "Check" to retrieve the current value. Then Pressing the button "Initialization" to reset the counter to zero.
  7. Press the "OK" and the counter will be reset.
  8. Turn off the printer as a program instructed then turn on again.
  9. Press "Finish" to close the screen.
  10. Close the software. Pressing the "Previous".
  11. In the next screen, click "Quit".
8:23 PM | 0 comments | Read More

How To Reset Waste Ink Pad Counter Epson R220 Printer

Written By Sefendi on Friday, November 4, 2011 | 12:54 AM

You can get software resetter for Epson R220, you can download at this link : Download Epson R220 Resetter.

Instruction to use Epson R220 Resetter Software :
  1. Double click Adjprog.exe.
  2. The following screen appears. Press the "Accept".
  3. On the next screen select Model Name R220, Port Selection And Destination as the following screen and then the OK button.
  4. Select the "Waste ink pad counter" and then click "OK".
  5. Select the "Check" to retrieve the current value. Then Pressing the button "Initialization" to reset the counter to zero.
  6. Press the "OK" and the counter will be reset.
  7. Turn off the printer as a program instructed then turn on again.
  8. Press "Finish" to close the screen.
  9. Close the software. Pressing the "Previous".
  10. In the next screen, click "Quit".
12:54 AM | 1 comments | Read More

Ho To Ink Reset For Epson L100, L200, L800

Written By Sefendi on Friday, October 28, 2011 | 8:19 PM

This video from youtube by SuperPrint2010


Epson L100, L200, L800 printers Ink Reset. Free ink reset - no codes no limits. You can now use compatible inks and refill Epson L100, L200, L800 printers. Reset the Ink Levels yourself. EASY and FREE. Download WIC Reset Utility - www.EpsonReset.com.
8:19 PM | 0 comments | Read More

How To Perform Printer Self Test Epson LQ-1170 From Panel Button

Written By Sefendi on Thursday, October 27, 2011 | 11:21 PM


Printer's Self Test on the Dot Matrix Printer Epson LQ-1170

Hold down the LF/FF (LQ mode) or LOAD/EJECT (Drafe mode) button while turning on the printer to perform the self test .The self test lets you check your printer is operating properly and give you a printout of the current DIP-switch setting.

Reset : ALT + PAUSE + Power-On, until printer beeps once.
Hex Dump Mode : LF/FF + LOAD/EJECT + Power-On.
11:21 PM | 0 comments | Read More

How To Reset Epson TX700W

Written By Sefendi on Friday, October 21, 2011 | 8:09 PM


Instruction to use Epson TX700W Resetter Software :
  1. The following screen appears. Press the "Accept".
  2. Press the "Particular Adjustment Mode".
  3. Select the "Consumables maintenance counter" and then press "OK".
  4. Select the button "Check" to retrieve the current value. Then Pressing the button "Initialization" to reset the counter to zero.
  5. Press the "Accept" and the counter will be reset.
  6. Turn off the printer. The counter was reset.
  7. Press the "Finish" to close the screen.
  8. Close the software. Pressing the "Previous".
  9. And on the next screen, press the "Quit".
8:09 PM | 0 comments | Read More

How To Reset Waste Ink Pad Counter Epson TX121 And ME320 Printer

Written By Sefendi on Thursday, October 13, 2011 | 2:36 AM


You can get software resetter for Epson TX121 And ME320, you can download at this link : Download Epson TX121 And ME320 resetter.

Instruction to use Epson TX121 And ME320 Resetter Software :
  1. Double click Adjprog.exe.
  2. The following screen appears. Press the "Accept".
  3. Press the "Particular Adjustment mode".
  4. On the next screen select Model Name "TX121" as the following screen and then the OK button.
  5. Select the "Waste ink pad counter" and then click "OK".
  6. Select the "Check" to retrieve the current value. Then Pressing the button "Initialization" to reset the counter to zero.
  7. Press the "OK" and the counter will be reset.
  8. Turn off the printer as a program instructed then turn on again.
  9. Press "Finish" to close the screen.
  10. Close the software. Pressing the "Previous".
  11. In the next screen, click "Quit".
2:36 AM | 0 comments | Read More

How To Reset Waste Ink Pad Counter Epson L100

Written By Sefendi on Wednesday, October 5, 2011 | 7:48 PM

You can get software resetter for Epson L100, you can download at this link : Download Epson L100 resetter.
Instruction to use Epson L100 Resetter Software :
  1. Double click Adjprog.exe.
  2. The following screen appears. Press the "Accept".
  3. Press the "Particular Adjustment mode".
  4. On the next screen select Model Name "L100" as the following screen and then the OK button.
  5. Select the "Waste ink pad counter" and then click "OK".
  6. Select the "Check" to retrieve the current value. Then Pressing the button "Initialization" to reset the  counter to zero.
  7. Press the "OK" and the counter will be reset.
  8. Turn off the printer as a program instructed then turn on again.
  9. Press "Finish" to close the screen.
  10. Close the software. Pressing the "Previous".
  11. In the next screen, click "Quit".
7:48 PM | 2 comments | Read More

Epson Printer Ink Secret

Written By Sefendi on Friday, September 30, 2011 | 9:38 PM

When the ink level will run out, usually the result of defective or does not print out good. In the Epson printer we can see the ink level in the status monitor.
Ink Lavel Low
Print Out Broken
Do not worry about this problem, there are tips and tricks to make a low ink cartridge chip can ride level. The way is unplug the cartridge that has been going out of the printer. Paper clip to poke a small hole above the cartridge chip. Then insert the cartridge into the printer. And see the changes. Ink levels will rise, if you want to print again, then the result will be good.
Printer Ink Secret
Ink Level Ok
For more details, you can see the video below, Video on Youtube by brusspup :

9:38 PM | 0 comments | Read More

How To Reset Waste Ink Pad Counter Epson Stylus CX1500

Written By Sefendi on Monday, September 26, 2011 | 9:05 PM


When you get the "service needed" or the "parts need changed" error, and the only light on the printer is one red led light. This is what you do.
  1. Turn on the printer.
  2. Download the Epson stylus Color Service Program CX1500.
  3. Unzip and run FT0077_0624.exe.
  4. In the upper tabs go to RD settings.
  5. Double click on option 7, Dump ROM data.
  6. When the new window opens go to Protection counter A, change the number there to 0.
  7. Click OK, then it will confirm that it has saved the ROM data and click ok, exit the application.
  8. Turn the printer off.
9:05 PM | 0 comments | Read More

How To Reset Waste Ink Pad Counter Epson Stylus TX400

Written By Sefendi on Friday, September 16, 2011 | 9:04 PM

You can get software resetter for Epson TX400, you can download at this link : Download Epson TX400 resetter.

Instruction to use Epson Stylus TX400 Resetter Software :
  1. The following screen appears. Press the "Accept"
  2. Press the "Particular Adjustment mode":
  3. Select the "Waste ink pad counter" and then click "OK":
  4. Select the "check" to retrieve the current value. then Pressing the button "Initialization" to reset the counter to zero.
  5. Press the "OK" and the counter will be reset.
  6. Turn off the printer. The counter was reset.
  7. Press "Finish" to close the screen.
  8. Close the software. Pressing the "Previous"
  9. And on the next screen, click "Quit"
9:04 PM | 0 comments | Read More

How To Reset Waste Ink Pad Counter Epson Stylus T23

Written By Sefendi on Friday, August 19, 2011 | 11:22 PM

You can get software resetter for Epson T23, you can download at this link : Download Epson T23 resetter.

Instruction to use Epson Stylus T23 Resetter Software :
  1. The following screen appears. Press the "Accept"  

  2.  Press the "Particular Adjustment mode":

  3. On the next screen select Model Name "T23" as the following screen and then the OK button. 

  4. Select the "Waste ink pad counter" and then click "OK":

  5. Select the "check" to retrieve the current value. Then Pressing the button "Initialization" to reset the  counter to zero.

  6. Press the "OK" and the counter will be reset.

  7. Turn off. The counter was reset.

  8. Press "Finish" to close the screen.

  9. Close the software. Pressing the "Previous"

  10. In the next screen, click "Quit" 

11:22 PM | 0 comments | Read More

Cheking The Print Head Nozzle Epson L100 Using The Printer Button Maintenance Your Printer

This method is one of printer maintenance we need to know. Checking the print head nozzles using the printer on Epson L100. Follow the steps below to check the print head nozzles using the printer buttons :
  1. Make sure that no lights are indicating errors.

  2. Turn off the printer.

  3. Make sure that A4 size paper is loaded in the sheet feeder.

  4. Hold down the stop/maintenance button and press the power button to turn on the printer. 

  5. When the printer turns on, release both the buttons. The printer prints the nozzle check pattern. 

10:42 PM | 0 comments | Read More

How To Reset Waste Ink Pad Counter Epson Stylus C79

Written By Sefendi on Thursday, August 11, 2011 | 1:23 AM


Before using the Software Resetter Epson Stylus C79, ensure that :
  1. Make sure you have the Software Resetter Printer Epson Stylus C79.

  2. Make sure that the damages requested in the printer reset Waste Ink Pad Counter ( usually the printer lights glow red - and green alternately print head does not move).

Instruction to use Epson Stylus C79 Resetter Software :
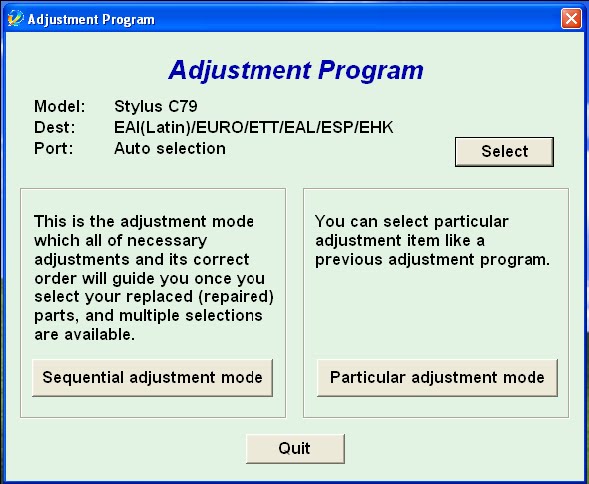
  1. The following screen appears. Press the "Accept"

  2. Press the "Particular Adjustment mode":

  3. Select the "Waste ink pad counter" and then click "OK":

  4. Select the "check" to retrieve the current value. then pressing the button "Initialization" to reset the counter to zero.

  5. Press the "Accept" and the counter will be reset.

  6. Turn off the printer. The counter was reset.

  7. Press "Finish" to close the screen.

  8. Close the software. Pressing the "Previous"

  9. In the next screen, click "Quit"

1:23 AM | 0 comments | Read More

How To Reset Waste Ink Counter Canon MP160/MP145

Written By Sefendi on Friday, August 5, 2011 | 3:13 AM


Before resetting the preview error message contained in the LCD your printer : following ways are used to fix a printer that has the message Error E27. Error Code E27 = Waste ink absorber full or platen waste ink absorber full. You can see in the title of my previous post regarding Error Code Canon MP145/MP160.

Procedure to Reset :
  1. Turn off the printer (make sure the power cord still attached), press and hold the STOP / RESET then press and hold the ON / OFF and release the STOP / RESET, then press the STOP / RESET 2x.
  2. Release both buttons, the printer is now in a position SERVICE MODE (on the printer's LCD appears the number "0").
  3. After the lights on / off the green, please press the STOP / RESET in accordance with the following instructions :
    Press 1x = Orange flame lights> for Service pattern print.
    Press 2x = Green light flame> for EEPROM print.
    Press 3x = Orange flame lights> for EEPROM reset.
    Press 4x = Light Green Flame> to the Waste ink counter reset.
  4. Turn the printer off and unplug the POWER.
  5. Turn on your printer.
3:13 AM | 0 comments | Read More

Error Code Canon MP145/MP160

Written By Sefendi on Thursday, August 4, 2011 | 8:57 PM


The following is a list of error codes for printers CANON MP145/MP160 that can be seen on the lcd your printer.

Error Code : 

E2-2 = No paper (ASF)
E3-3 = Paper jam
E4 = No ink
E5-5 = The ink cartridges are not installed or a non-supported ink cartridge is installed, or the ink cartridges are not installed properly
E8 = Waste ink absorber full, or platen waste ink absorber full
E9 = The connected digital camera / video camera does not support Camera Direct Printing
E14 = The Ink cartridges whose destination are wrong
E15 = Ink cartridge is not installed E16 – Ink remaining is unknown
E16 -E19 = Failed to scan head alignment sheet
E22 = Carriage error
E23 = Paper feed error
E24 = Purge unit error
E25 = ASF(cam) sensor error
E26 = Internal temperature rise error
E27 = Waste ink absorber full or platen waste ink absorber full
E28 = Ink cartridge temperature rise error -
E29 = EEPROM error
E33 = Paper feed position error
E35 15 = USB Host VBUD overcurrent error – USB
E37 17 = Abnormal motor driver error
E40 20 = Other hardware error
E42 22 = Scanner error
8:57 PM | 0 comments | Read More

How to perform a Self Test Epson Stylus Office All-In-Ones with an LCD screen


Epson All-In-Ones printer with an LCD screen : BX600FW, BX610FW, BX625FWD, PX700W, PX710W. 

Printer Operation Check (Self Test) procedure : 
  1.  Make sure both the printer and computer are turned off.
  2. If using a USB or Ethernet connection, disconnect the cable from the interface connector of the printer.
  3. Make sure that A4 size paper is loaded in the auto sheet feeder. For the PX700W/PX710W, make sure that A4 size paper is loaded in the main tray in the paper cassette. If your printer has a CD/DVD print feature, check that it is not in CD/DVD mode or if your printer came with a CD/DVD tray, that the tray is not inserted in the printer.
  4. Press the On button to turn on the printer.
  5. Press the Setup button to enter the setup mode.
  6. Press the Left or Right button to select Maintenance, then press the OK button.
  7. Press the Up or Down button to select Nozzle Check, then press the OK button.
  8. Press the Start button to start the ink nozzle check.
  9. A test page prints showing a nozzle check pattern.
3:04 AM | 0 comments | Read More

How to perform a Self Test Epson Stylus Office BX Series


Type Stylus Office BX : BX300F, BX310FN, BX320FW, BX525WD.
Printer Operation Check (Self Test) Epson Stylus Office BX Series :
  1. Make sure both the printer and computer are turned off.
  2. If using a USB or Ethernet connection, disconnect the cable from the interface connector of the printer.
  3. Press the On button to turn on the printer.
  4. Make sure that A4 or Letter size paper is loaded in the auto sheet feeder.
  5. Press the Menu button to open the copy settings menu.
  6. Press the Up or Down button to select Maintenance, then press the OK button.
  7. Press the Up or Down button to select Nozzle Check, then press the Colour Copy button to start the ink nozzle check.
  8. A test page prints showing a nozzle check pattern.
2:55 AM | 0 comments | Read More

How To Install The Advanced Printer Driver (APD) for EPSON TM/EU/BA Printers

Written By Sefendi on Friday, July 29, 2011 | 10:07 PM

To get the Advanced Printer Driver, you can download at this link : Advanced Printer Driver.
This driver is version 4, support OS :
  • Windows XP Professional SP3 Home Edition (32bit)
  •  Windows Vista Business / Ultimate / Enterprise SP1 Home Edition (32bit)
  •  Windows XP Embedded SP2
Support Models List : TM-H5000II, TM-H6000II, TM-H6000III, TM-J7000/J7100, TM-J7500/J7600, TM-C100, TM-T70, TM-T88III, TM-T88IV, TM-T90, TM-P60, TM-P60, TM-L60II, TM-L90, TM-L90 Peeler, TM-U120, TM-U220A, TM-U220B, TM-U220D, TM-U230, TM-U375, TM-U675, TM-U950, TM-U295, TM-U590, DM-D110, DM-D120, DM-D210, DM-D500, EU-T300, EU-T400, EU-T500, BA-T500.

Installation :
  1. Double click the [APD] icon and start the installation.
  2. The Install ShieldWizard screen appears. Click the [Next] button.
  3. The “License Agreement” screen appears. Read the content and select "I accept the terms of the license agreement". Then click the [Next] button.
  4. The “Setup Type” screen appears. Select "Standard", then click the [Next] button.
  5. The “Printer Configuration” screen appears. When installing the printer driver as well as the APD, click the [Add] button. When you want to install the printer driver later, click the [Next] button and proceed to Step 11.
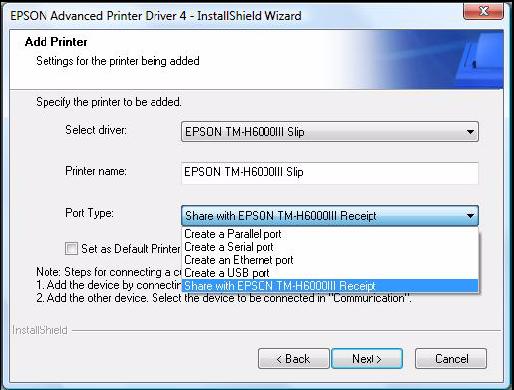
  6. The “Add Printer” screen appears. Configure the printer driver and port to use, and click the [Next] button.
  7. The “Parallel Port Settings” screen appears. Configure the settings of the Parallel port and click the [Next] button. Proceed to Step 10.
  8. The “Serial Port Settings” screen appears. Configure the settings of the Serial port and click the [Next] button. Proceed to Step 10.
  9. The “Ethernet Settings” screen appears. Configure the IP Address of the TM printer and click the [Next] button. Proceed to Step 10.
  10. The display returns to the “Printer Configuration” screen. All the printer drivers, configured between Step 6 to Step 9, appear in the list. To install multiple printer drivers, repeat Step 5 to Step 9. To install the same printer driver multiple times, click the [Copy] button.
    For the following installation combinations, select the setting of the first printer driver for the “Port Type” of the “Add Printer” screen at Step 6 when you install the second or later printer drivers (example: “Share with EPSON TM-H6000III Receipt”). • Using both the Receipt driver and Slip driver for a hybrid printer. • Using peeler paper on one label printer and using full-label paper on another label printer. • Making multiple different print settings on multiple printer drivers (Example: using two drivers, specify portrait receipt printing on one driver and specify landscape receipt printing on another driver).
    When the settings of the printer drivers are finished, click the [Next] button.
  11. The “Start Copying Files” screen appears. See "Current Settings" to confirm the installation settings and then click the [Next] button.
  12. The “InstallShield Wizard Complete” screen appears. Click the [Finish] button to finish installation.
10:07 PM | 0 comments | Read More